Saving Audio Files
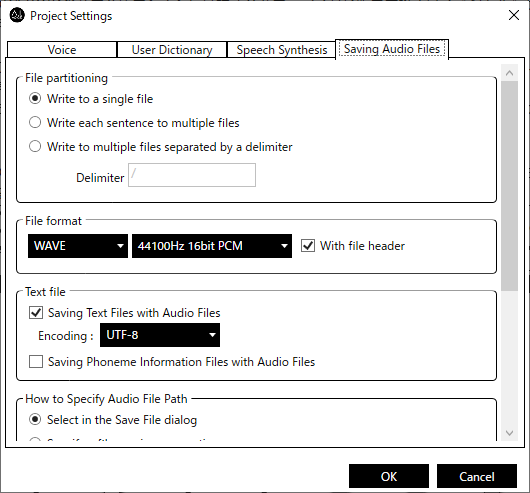
Allows you to configure settings related to audio storage.

File partitioning

- Write to a single fileCreates a single audio file from all the input text.
- Write each sentence to multiple filesIt splits text into sentences and creates one audio file from each sentence.List format creates a single audio file from a single line.
- Write to multiple files separated by a delimiterSplits the text with the specified delimiter string and creates each as an audio file.* Audio saving in List format is not supported. When this section is selected, a message will be displayed and saving will be executed in the format of “Write each sentence to multiple files”.
File format

- File formatSelect the output audio file format from WAVE, MP3, and WMA.
- Audio qualitySelect the audio quality. The items corresponding to the selected file format will be displayed.
- With file headerThis option is available only when the file format is WAVE. When checked, header information will be added to the audio file. If unchecked, the file will be created in RAW format with no header information added.
Text file

- Saving Text File with Audio FiesIf checked, a text file (.txt) with the same name will be created when the audio is saved.The file will be split under the same conditions as the audio file.
- EncodingSpecifies the character encoding when saving a text file.
- Saving Phoneme Information Files with Audio FilesIf checked, a phoneme information file (.lab) with the same name will be created when the audio is saved.The file will be split under the same conditions as the audio file.
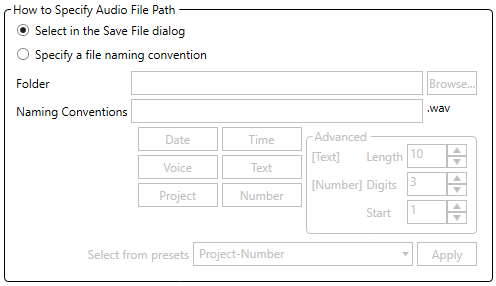
How to Specify Audio File Path

Sets the path for saving audio files.
- Select in the Save File dialogEach time you save audio, use the general file saving dialog to specify the destination.
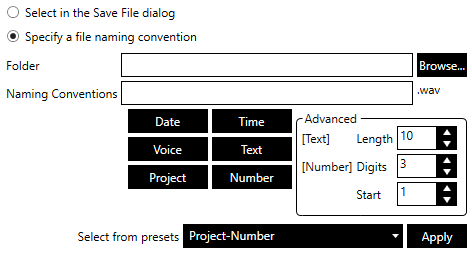
- Specify a file naming conventionSpecify the file output destination and naming convention in advance, and the file path will be determined automatically when the audio is saved.

- FolderSpecifies the path of the folder where the files will be output.In addition to direct input, you can also specify it in the folder selection dialog that appears when you click the “Browse…” button. button on the folder selection dialog box that appears when you click the “Browse…” button.
- Naming conventionsSpecifies the file naming convention.It is also possible to specify a folder following the output folder by describing the path separator (\).Tag will be automatically replaced with the corresponding string when the audio file is saved.Tags can be inserted at the current cursor position in the input field by pressing the respective button.
Button display name
Tag
Description
Date
{yyyyMMdd}
The date will be replaced with the date when the save was executed.
Time
{HHmmss}
This will be replaced by the hour, minute, and second of the save run.
Voice
{VoicePreset}
This will be replaced by the voice preset name.
Text
{Text}
It will replace the beginning of the text.
Project
{Project}
This will be replaced by the project name.
Number
{Number}
The number will be replaced by a sequential number starting from the specified start number.
Some tags have advanced settings.Text tag
- Number of charactersSpecifies the number of characters in the text. If the text is less than the specified number of characters, the entire text will be output.
Number tag
- Number of digitsSpecifies the number of digits of the sequential number. When the number is less than the specified number of digits, 0 is added to the beginning. If the number exceeds the number of digits, all digits of the number are output.Example) Number of digits: 3, Number: 1 => 001Example) Number of digits: 3, Number: 25 => 025Example) Number of digits: 3, Number: 1234 => 1234
- Start numberSpecifies the starting number of the sequential numbering.
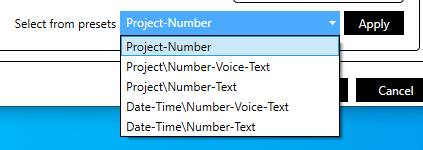
Among the strings in the input field, strings starting with “{” and ending with “}” are regarded as tags.If the tag matches the one in the voice, text, project, and sequential number above, it will be replaced by the respective value.If there is no match, it will be treated as a date/time format specification string.For example, in “{yyyyMMdd}” inserted as a date tag, “yyyy” is converted to the year (4 digits), “MM” to the month (01-12), and “dd” to the day of the month (01-31), and in “{HHmmss}” inserted as an hour, minute, and second tag, “HH” is converted to the hour (00-23), “mm” to the minute (00-59), and “ss” to the second (00-59) in 24-hour format.It is also possible to specify “{yyyy year MM month dd day}” or “{HH hour mm minute ss second}” including arbitrary characters. However, please note that some characters such as “/” and “:” cannot be used in file names due to Windows limitations.To use “{” and “}” in the file name, write “{{” and “}}” respectively.The following is an example where the project name is “Project”.Example 1) “{Project}”->”Project” (recognized as a project name tag and replaced)Example 2) “{{Project}}”->”{Project}” (“{{” becomes “{” and “}}” becomes “}”)Example 3) “{{Project}}”->”{Project}” (“{{” becomes “{” as a character, “}}” becomes “}” as a character, and “Project” is treated as just a string)You can also use the preset naming conventions from the “Select from Presets” combo box. Select the preset you want to use from the combo box and click on the “Apply” button.
* If “Write each sentence to multiple files” or “Write to multiple files separated by a delimiter” is specified in the File partitioning and “Number” is not included in the naming rule, a sequential number is automatically added at the end of the file name to prevent duplication.